(公開: 2017年6月13日)
「gnuplot は使いにくい」と思う人は多いと思います。
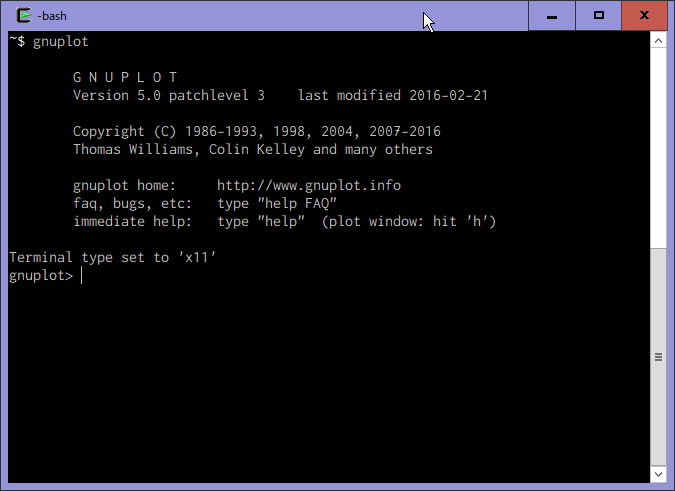
実際、gnuplot は下の画面のようなコンソールでコマンドを一つ一つ入力するスタイルです。
正直、ぼくもコマンドをコンソールから入れるのはあまりやりません。
この記事ではEmacsからgnuplotを操って、gnuplotの生活を快適にする方法について説明します。
目次
Windows上の Emacs から gnuplot を使う上での注意
最初にWindows上のEmacsを使う場合の注意を述べておきます。
Windows上 で Emcas から gnuplotを操る場合、Emacs, gnuplotともにCygwin のパッケージを使うことが必要です。
EmacsとgnuplotはWindowsのネイティブアプリケーションとしてビルドされたバイナリが配布されていますが、少なくともぼくが試した結果では、Emacsとgnuplotの通信が上手くできません。
Emacs から gnuplotを使うメリット
Emacs から gnuplot を使うメリットは以下の通りです:
- Emacs 上からgnuplotスクリプトを編集して、Emacs上でそのスクリプトを実行できる
- よく使うグラフのテンプレートを呼び出せる
- 作ったグラフを後で使いまわすことができる
gnuplot スクリプトを使うのポイントです。
gnuplot スクリプトとは
gnuplot スクリプトというのは、gnuplotのコマンドを列挙したファイルです。
このスクリプトファイルを gnuplotに渡すとgnuplotはスクリプトに書かれたコマンドを順番に実行します。
Emacsのgnuplot-modeを使うと、gnuplot スクリプトを編集して、Emacs上でgnuplotにスクリプトを実行させることが出来るのです。 これがEmacsを使うと便利な理由なのですよ。
Emacsでのテキスト編集は慣れると、何でもEmacsで編集したくなります。 gnuplotスクリプトも慣れているEmacsで編集できると、効率アップするのは間違い無しです!!
gnuplot スクリプトファイルの拡張子は.gpとしておきます。
gnuplot スクリプトの例
gnuplot スクリプトの例を下に示します。
unset grid
set terminal pdfcairo enhanced color font "Helvetica,14"
set output "color.pdf"
set xlabel 'xlabel' font "Helvetica,28"
set ylabel 'ylabel' font "Helvetica,28"
set tics font "Helvetica,25"
set xrange [:]
set yrange [:]

rgb(r,g,b) = sprintf("#%02x%02x%02x",r%256,g%256,b%256);

plot sin(x) title "" with  lines lc rgb rgb(255,0,0) lt 1 lw 2,\
     sin(x+0.5) title "" with  lines lc rgb rgb(255,64,0) lt 1 lw 2,\
     sin(x+1.0) title "" with  lines lc rgb rgb(255,128,0) lt 1 lw 2
unset terminal
gnuplot-mode のインストールと設定
Emacsから gnuplot を操るには gnuplot-modeを使うのが便利です。
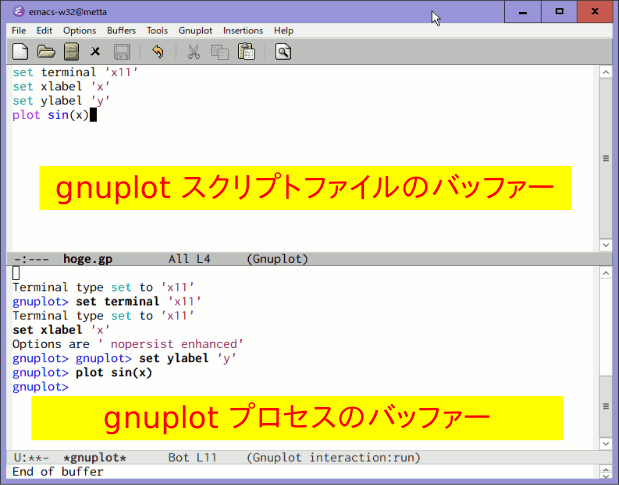
gnuplot-modeを使っている例を下に示します。
上側がgnuplotスクリプトを開いているバッファーで、下側がgnuplotのプロセスバッファーです。
gnuplot-modeのインストール
https://github.com/bruceravel/gnuplot-mode からダウンロードするか、package.el(MELPA)でインストールします。
package.el(MELPA)でインストールする場合はC-x package-install(RET)でgnuplot(RET)です。 (MELPA上では”gnuplot-mode”ではなく、”gnuplot”です。)
MELPAにはgnuplot-modeという、別の作者による似たようなmodeもあるので注意しましょう。
gnuplot-modeの設定
package.el(MELPA)を使わないでインストールした場合は、パスを指定しておきます。
;;(setq load-path (append (list "~/.emacs.d/elpa/gnuplot-20141231.1337") load-path))

(require 'gnuplot)
(autoload 'gnuplot-mode "gnuplot" "gnuplot major mode" t)
(autoload 'gnuplot-make-buffer "gnuplot" "open a buffer in gnuplot mode" t)
(setq auto-mode-alist (append '(("\\.gp$" . gnuplot-mode)) auto-mode-alist))
Windows上の場合は環境変数DISPLAYを設定しておきます:
;; for Windows/Cygwin
(setenv "DISPLAY" ":0.0")
gnuplot-modeでのコマンドとキーバインド
よく使うのは以下のコマンドです:
| キーバインド | コマンド |
|---|---|
| C-c C-b | バッファー全体をgnuplotに送る |
| C-c C-e | カーソルをプロセスバッファーとgpファイルバッファーとの間で切り替える |
| C-c TAB | カーソル箇所にファイルを挿入する |
| C-c C-k | gnuplotプロセスを終了する |
| C-c C-C | region のコメントアウト |
次のようなコマンドも用意されています:
| キーバインド | コマンド |
|---|---|
| C-M-i | gnuplotコマンドを補完する |
| C-M-x | gnuplotに行を送る |
| C-c C-l | gnuplotに行を送る |
| C-c C-v | gnuplotに行を送って次の行に移る |
| C-c C-f | gnuplotにファイルを送る |
| C-c C-r | gnuplotにregionを送る |
| C-c C-w | gnuplotのバージョンを表示する |
| C-c C-z | gnuplotのカスタマイズ |
gnuplot-modeを使っているデモ動画
gnuplot-modeを使ったデモ動画です。
テンプレートを自動で挿入するには
以下のような設定を入れておきます。autoinsertを使います。オリジナルはネット上で見つけたのですが、今はサイトが無いようです。
gpファイル以外のファイルのテンプレートを使う設定になっていますが、ここではそれらの説明は省略します。
(2019-08-18修正: 下記のコードが動かなくなっていたので修正しました。修正にはemacsのautoinsertで楽する (fnwiya’s quine)を参考にしました。)
(require 'autoinsert)
(setq auto-insert-directory "~/.emacs.d/insert/")


(require 'cl)
(defvar my:autoinsert-template-replace-alist
  '(("%file%" .
     (lambda()
       (file-name-nondirectory (buffer-file-name))))
    ("%author%" . (lambda()(identity user-full-name)))
    ("%email%"  . (lambda()(identity user-mail-address)))
    ("%filewithoutext%" .
     (lambda()
       (file-name-sans-extension (file-name-nondirectory (buffer-file-name)))))
    ))

(defun my:template ()
  (time-stamp)
  (mapc #'(lambda(c)
            (progn
              (goto-char (point-min))
              (replace-string (car c) (funcall (cdr c)) nil)))
        my:autoinsert-template-replace-alist)
  (goto-char (point-max))
  (message "done."))


(setq auto-insert-alist
      (append '(
                (ruby-mode . "ruby-template.rb")
                ("\\.html"  . "html-insert.html")
                ("\\.gp"  . ["gpfile-template.gp" my:template] )
                ("\\.sh"  . "sh-template.sh")
                ("\\.rb"  . "ruby-template.rb")
                ) auto-insert-alist))
;;
(auto-insert-mode 1)

(add-hook 'find-file-not-found-hooks 'auto-insert)
(provide 'my-auto-insert-init)
;;; my-auto-insert-init.el ends here
gp ファイルのテンプレート例
上記の設定と合わせて使います。新しいファイル名で以下のファイルを開くと、自動的にファイル名を挿入します。自分の好みでカスタマイズして下さい。
テンプレートファイルは上の設定ファイルでは~/.emacs.d/insert/gpfile-template.gpに置きます。
unset grid
#set terminal x11
#set terminal emf color enhanced font "Helvetica" 24
set terminal pdfcairo color enhanced font "Helvetica,18"
#set output "%filewithoutext%.emf"
set output "%filewithoutext%.pdf"

set xlabel 'xlabel' font "Helvetica,18"
set ylabel 'ylabel' font "Helvetica,18"
#set y2label 'y2label' font "Helvetica,18"
#set format y '$10^{%T$}'
#set format y "10^{%L}"
#set logscale x
#set logscale y
set size ratio 0.8
set tics font "Helvetica,18"
set xrange [:]
set yrange [:]
# set ytics nomirror
# set y2tics nomirror
# set xtics 0.1
# set ytics 0.4
# set y2tics 0.4
#set key left top
set pointsize 2
set fit logfile "%filewithoutext%.log"
#set datafile separator comma
#set data style linespoints
set style data  point
f1(x) = a1 + b1 * x


# fit f1(x) '' using ($1):2 via a1,b1

plot '%filewithoutext%.dat' using ($1):($2) title "" with lines \
     lc rgb hsv2rgb(0, 1, 1) lt 1

#     f1(x) title "" with lines lt 1 lw 2 lc rgb "blue"

unset output
まとめ
gnuplot-modeはgnuplotをとても使いやすくしてくれますから、Emacsに慣れている人は試してみる価値があると思いますよ!!